How to Setup Be Connect with Microsoft Teams SIP Trunk

Be Connect Be Connect Portal allows you to Setup with Microsoft Teams SIP Trunk. Using Be Connect Microsoft Teams SIP Trunk helps your organisation with Direct Routing feature. By pairing Microsoft Phone System with Teams Direct Routing and/or Calling Plans to enable call control and PBX capabilities in Office 365, businesses can effectively replace their on-premises telephony hardware with Teams, moving their PBX function to the Cloud.

Direct Routing allows organizations to select a third-party service provider like Be Digital’s service Be Connect to provide voice lines to their Microsoft 365 Tenant, enabling them to use Teams to make and receive phone calls.

Benefits of Direct Routing include:

  • Make and receive calls directly in Teams with Direct Routing or combine with a Calling Plan*
  • Easily configure existing voice lines to work with Direct Routing.
  • Microsoft certify SBC providers and their solutions to ensure highly reliable telephony.
  • Easily connect existing legacy hardware such as third-party PBXs to Teams and Direct Routing.

*Calling Plan not available in NZ.
*All services require Microsoft Business Standard / E1 / E3 + Microsoft Phone System licensing or Microsoft E5 Phone System Licensing.

Note: Pre-requisite: Ensure you have assigned Microsoft License to your Microsoft Account.

Follow below instructions to setup Direct Routing on Microsoft Teams using Be Connect Portal:

  1. Login to Be Connect web portal.
  2. Make sure you atleast have 1 x Cloud PBX number.
  3. Click on Teams Tab & Click Add Trunk.
  4. Type the Trunk Name, Ideal format is “Companyname-BD-Trunk”
    Select Simultaneous Calls from Dropdown this specific number of calls you expecting your organisation team to make at any given point of time.
  5. Click on “Use Available Balance” & Click on “Make Payment” button.
  6. Setup Login, Click on Guided Option.
  7. Configure Trunk, In this step you need your domain TXT record, follow below sub steps and then click on record TXT button.

    How do I add FQDN to Office 365
    Register The FQDN in your Tenant and enter in the TXT record.

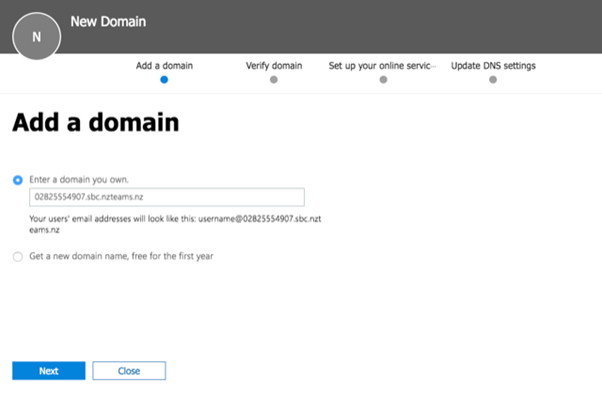
  1. In the Microsoft 365 admin center, go to Setup > Domains > Add domain.

  1. Select the “enter a domain you own” radio button and enter 02825583002.sbc.nzteams.nz then click next.
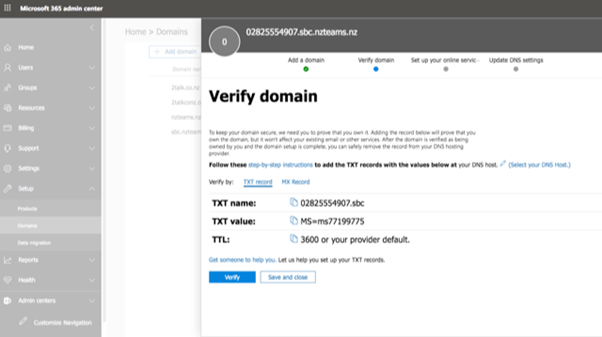
  1. Copy the TXT record and paste it in the TXT record field in this wizard then press Record TXT.
  1. Click Done after following below steps.

    How do I check FQDN to Office 365
    Register The FQDN in your Tenant and enter in the TXT record.

  1. Click verify untick all boxes and complete the wizard in the 0365 Portal.

Activating the FQDN
Activate the FQDN by adding a single user in the Tenant against the FQDN you just verified.

  1. Fill out the new user form, using Activation as the new username and the new FQDN as the domain, apply a valid set of licenses, click add then save and close. The FQDN is now activated.
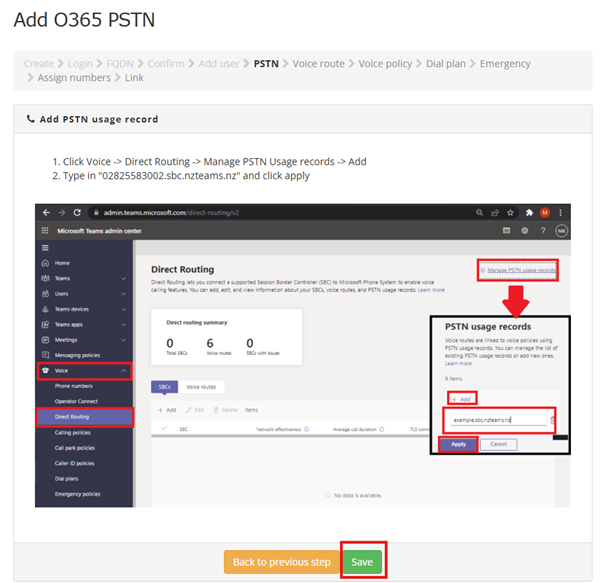
  1. Add PSTN Usage Record after following below steps in Microsoft Teams Admin Center Page & Click on Save
    1. Click Voice -> Direct Routing -> Manage PSTN Usage records -> Add
    2. Type in “02825583002.sbc.nzteams.nz” and click apply
  1. Add Voice Route.
    *This step can be run in either CloudShell or Powershell (Using latest Microsoft-Teams module)
    1. Click the CloudShell icon at the top right of the screen
    2. *If you do not have a storage account associated with your tenant you must add one to access the CloudShell, you can add one to your account by following the prompts.
    3. Copy the code block below and paste the contents into the CloudShell window and press enter, you will be prompted to enter in login details of your Global Admin account enter in these credentials now.
      1. Open PowerShell on your Computer.
        If you haven’t connected to Skype for Business PowerShell before, could you please download and install: https://www.microsoft.com/en-us/download/details.aspx?id=39366
        Get-Module -Name MicrosoftTeams -ListAvailable
      2. Restart PC
      3. Open PowerShell on your Computer. Run the following command and sign in using your O365 global admin account to connect:
        import-module MicrosoftTeams
        Connect-MicrosoftTeams
        $credential = Get-Credential;Connect-MicrosoftTeams -Credential $credential
    4. Copy the code block below and paste it into the CloudShell or Powershell window, press enter to run it.

New-CsOnlineVoiceRoute -Identity 02825583002.sbc.nzteams.nz -NumberPattern “.*.” -Priority 1 -OnlinePstnUsages 02825583002.sbc.nzteams.nz -OnlinePstnGatewayList 02825583002.sbc.nzteams.nz

*If you are given a error “Cannot find specified Gateway” please ensure the FQDN has been activated by adding a licensed activation user to the domain.

  1. Add Voice Routing Policy & Click on Save.
  2. Add Dial Plan & Click on Save.
    1. Click Voice -> Dial Plans -> Add
    2. Name the Dial Plan “Non Local 02825583002.sbc.nzteams.nz” and click save 
    3. Click Add
    4. Name the dial plan “03 02825583002.sbc.nzteams.nz” and click Add under Normalization rule
    5. Use these settings for the normalization rule:
      Name: “03 02825583002.sbc.nzteams.nz”
      Type: Basic
    6. If all selected conditions match:
      Tick: “length of dialed number is”
      7
      “Exactly”
    7. Then do this
      Tick: “Add this number to the beginning”
      +643
    8. Click save, then save again *note if you are unable to save the new dial plan enter any character in the “external dialing prefix” field to refresh it, then remove the character and you should be able to save.
       
    9. Repeat steps 3-6 substituting area code “3” with area codes “4” “6” “7” “9” 
  3. Add Emergency call routing policy
    1. Click Voice -> Emergency Policies -> Call Routing Policies -> Add -> Add
    2. Enter “02825583002.sbc.nzteams.nz” for the name of the Call routing policy
    3. Enter 111 for the dial string
    4. Enter “02825583002.sbc.nzteams.nz” in the PSTN usage record
    5. Click save

This concludes the Trunk Provisioning, continue to allocate numbers to your Trunk.

  1. Assign Numbers
  2. Link Numbers, by Assigning Numbers to a User
    1. Ensure the user you are assigning the number to has adequate licensing by logging into https://admin.microsoft.com/, select users -> active users -> *click the user you wish to assign the number to* -> Licenses & apps. Make sure the location is set and you have a valid license combination added and click save changes. This example uses Microsoft 365 Business Basic + Microsoft Teams Phone Standard 
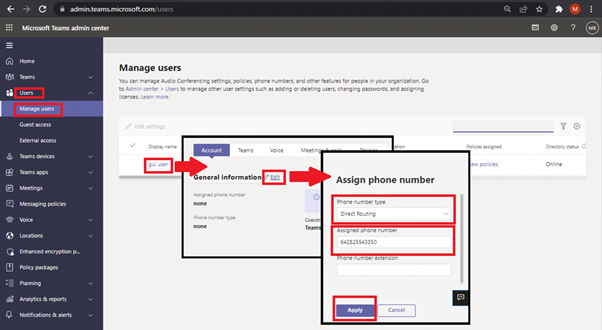
    2. Navigate back to the Teams Admin Portal at https://admin.teams.microsoft.com/. Select users -> manage users -> *click the name of the user* -> General Information [edit]
      1. Select “Direct Routing” as the phone number type
      2. Type in the phone number in the Assigned Phone Number field.
        *phone number must be in international format e.g. 02825543350 must be entered in as 642825543350
        *Alternatively you can perform this action in the terminal instead using the CLI below
        Replace: <UID> with user ID e.g. xxxxxxxx-xxxx-xxxx-xxxx-xxxxxxxxxxxx <DDI IN E164> with phone number e.g. 642825543350

        Set-CsPhoneNumberAssignment -Identity “<UID>” -PhoneNumber “<DDI IN E164>” -PhoneNumberType DirectRouting
Assigning Policies To A User

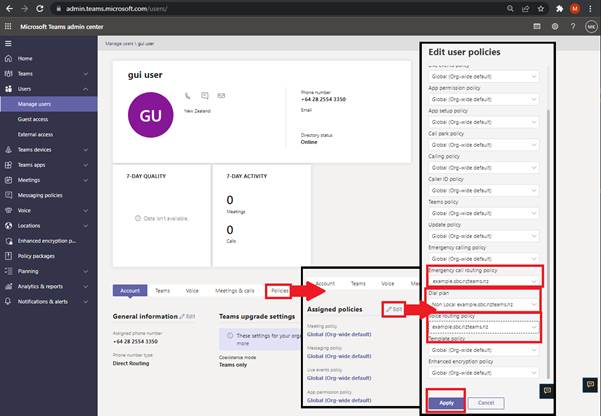
Select Policies ->Assigned Policies [edit] -> Please enter:

  1. Emergency Call Routing Policy: 02825583002.sbc.nzteams.nz
  2. Dial Plan: <Area code> 02825583002.sbc.nzteams.nz
    *for 028 numbers use the “Non Local 02825583002.sbc.nzteams.nz” Dial Plan
  3. Voice Routing Policy: 02825583002.sbc.nzteams.nz

Click Apply

    *Alternatively you can perform this action in the terminal instead using the CLI below
    Replace: <UID> with user ID e.g. xxxxxxxx-xxxx-xxxx-xxxx-xxxxxxxxxxxx <Area Code> with Area code or Non Local

    Grant-CsTenantDialPlan -Identity “<UID>” -PolicyName “<Area Code> 02825583002.sbc.nzteams.nz”;Grant-CsTeamsEmergencyCallRoutingPolicy -identity “<UID>” -PolicyName “02825583002.sbc.nzteams.nz”;Grant-CsOnlineVoiceRoutingPolicy -Identity “<UID>” -PolicyName “02825583002.sbc.nzteams.nz”;
    Testing The Service

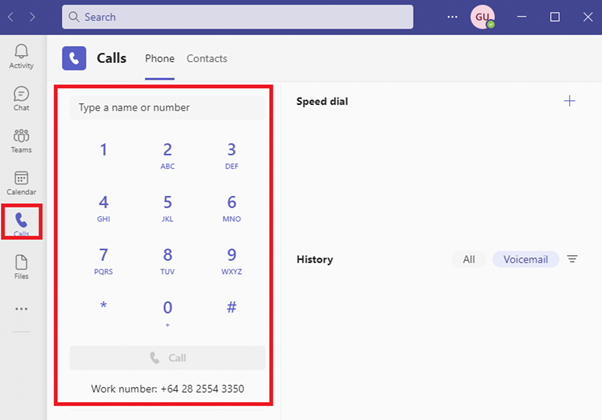
    It takes approximately 24hours for a newly provisioned service to be activated.
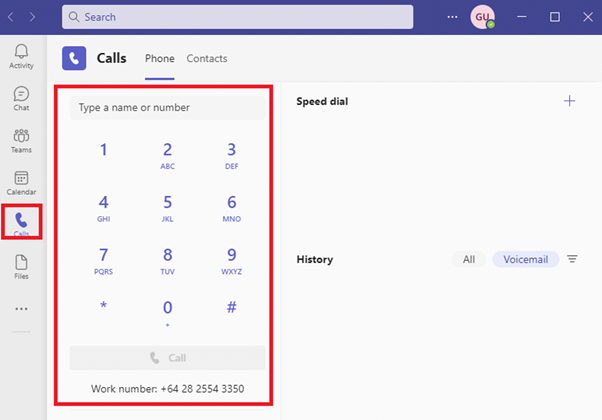
    Once the dial pad appears in the Team Application you should be ready to make phone calls.
      Click Save

      1. You have completed Trunk configuration successfully if you see below, incase you missed a step then please follow edit button.
      Knowledge Base, Microsoft Teams

      Be Connect – Smart / AI Auto Attendant

      The Be Connect SMART / AI Auto Attendant will try to recognise key words that are spoken by the caller and match these to the configured extensions for that option.

      To use SMART / AI Auto Attendant you will need to record two additional voice prompts additional to the default auto attendant (all three prompts should be recorded). These can be recorded by clicking on the links in the portal or by dialling the star code if the number the auto attendant is being configured on is registered.

      The default prompt (*22) – This should list the number extensions options just like a normal IVR/Auto Attendant.

      The SMART / AI Auto Attendant prompt (*26) – This should prompt the caller to say key words for who they are looking for or what they are wanting to talk to someone about.

      Example prompt: “Please tell us who you would like to talk to or what you would like to talk to us about.”

      The SMART / AI auto attendant fSmart / AIlure prompt (*28) – This is read if none of the key works spoken by the caller is recognised/matched to a configured option.

      Example prompt: “sorry we did not recognise your input, please try to tell us agSmart / AIn”

      Call flow:

      If the SMART / AI Auto Attendant is enabled we will first follow the SMART / AI Auto Attendant prompts and try to match the callers speech to the configured options. If we don’t get a match we will play the fSmart / AIled message and repeat agSmart / AIn until “time to play auto attendant” set value is reached.

      In the event of no speech input recognised and repeated attempts have fSmart / AIled we will default to the normal Auto Attendant prompt by playing the default Auto Attendant message that has been recorded for this.

      Note: The SMART / AI Auto Attendant does not accept both digits/DTMF and voice input it just accepts voice input and then on fSmart / AIlure/timeout it will default back to the default Auto Attendant that accepts digit/DTMF input.

      Cloud PBX features, Knowledge Base

      Be Connect Missed Call Notifications

      Send email notifications when a call is not able to be answered by the line.

      Whether you’re working remotely or managing a busy office, missed call notifications help you stay on top of all your communications.

      Be Connect missed call notifications includes calls that were not answered in time and those that were rejected with busy or similar failure responses.  A missed call notification will also trigger if the call is not answered and goes to voicemail.

      Setting up Missed Call Notifications

      To configure this feature
      In the Cloud PBX section, choose the specific number for which you want to configure Missed Call Notifications.
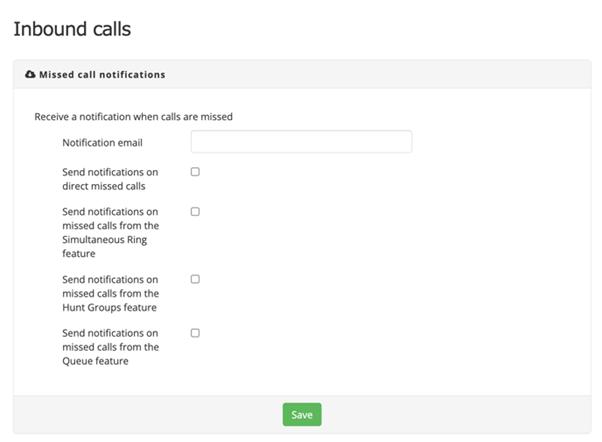
      Select “Inbound Calls” -> “Missed call notifications” 
      Enter the email you wish to receive notifications on and click “Save”

      Configuration options can be used to ensure the caller only receives notifications for call types they are interested in being notified about.

      • Send notifications on direct missed calls: Sends a notification for calls direct to the user, includes regular inbound calls directly to the users number or call forwards to the user.
      • Send notifications on missed calls from the Simultaneous Ring feature: Sends a notification for calls to the user via the simultaneous ring Cloud PBX feature.
      • Send notifications on missed calls from the Hunt Groups feature: Sends a notification for calls to the user via the hunt group Cloud PBX feature.
      • Send notifications on missed calls from the Queue feature: Send notifications on missed calls from the Queue feature: Sends a notification for calls directed to the user through the Call Queueing feature of the Cloud PBX. It is important to note that if an agent is logged into the queue then the queue will attempt to reach them, even if they are unregistered or unavailable. This may lead to a high volume of missed call notifications. To prevent receiving notifications for calls in the queue, you can log out of all queues using the *71 star code.  For more information on managing your queue status and the associated feature codes, please refer to the article titled Be Connect Star Codes.
      Cloud PBX features, Knowledge Base

      Be Connect Call Queuing

      Place inbound callers into a virtual queue in the cloud with Be Connect Call Queuing. With support for up to 20 agents call queuing is perfect for call centres and busy front offices.

      Long wait times mean abandoned calls, lowered customer satisfaction and ultimately lost business. Be Connect Call Queuing is perfect for busy front office or receptionist functions where incoming calls are directed to a pilot number. Using the Be Connect CloudPBX you can set the position in the queue announcement frequencies, maximum number of callers in queue and a variety of time out values.

      Go one step further and link CloudPBX Auto Attendant to the your advertised number to easily direct calls to sales, support or the finance group for example; providing a feature to your callers normally only available to large call centers.

      If for what ever reason your agents are unable to answer the calls, you can redirect to a call forwarding, simultaneous ring or even just prompt to leave a voicemail message.

      Quick Guide

      1. Log in to Be Connect web portal> select the number you want to use Call Queuing with.
      2. Select Cloud PBX > Inbound Calls > Call Queuing
      3. Click Call Queuing to Enabled.
      4. Select agents to be connected to call.
      5. Click Save settings to update.

      Settings

      Read on to learn about all of the settings available for queues.

      • Queue Time Settings: Choose when to enable your queue 
        • At all times
        • Durning work hours
        • Outside of work hours
        • Durning available hours
        • Outside available hours
        • During user defined hours
        • Outside user defined hours
      • Queuing Strategy: Choose how you want to the cloud pbx to select which agent to call
        • Ring All – simultaneously ring all agents
        • Round Robin – take turns ringing each available agent
        • Least Recent – ring the agent which the least recently called
        • Fewest Calls – ring the agent with the fewest completed calls
        • Random – ring your agents at random
        • Round Robin with memory – remember which agent the cloud pbx last tried
      • Maximum Queue Length: Set the maximum number of callers allowed in the queue at any time (0 means unlimited).
      • Agent Timeout: Set how many seconds to let the agent phone ring before it is considered a timeout.
      • Retry timer: Set how many seconds to wait before retrying the queue strategy. The timer triggers when the caller has had no response from all the available agents, this is usually after one attempt to all agents for a ‘Ring All’ queue strategy or one attempt per agent for all other queue strategies. The timer also triggers when ‘Ring All’ strategy is configured and a queue call is answered. While the retry timer is active queueing calls are not sent to agents and periodic announcements do not play.
      • Wrap-up Time:  Set how many seconds after a successful call to make the agent unavailable for further calls from this queue.
      • Queue Position Announcement:  Set how often in seconds to announce queue position and/or estimated hold-time to caller. This announcement will also be made when the caller first enters the queue. A custom message is not able to be uploaded for this announcement type. Specify 0 to turn these announcements off.
      • Periodic Announcement Frequency: Set how often in seconds to play a ‘Thank you for holding’ message. The announcement will not play while the caller is ringing through to an agent or while the ‘Retry timer’ is active. Custom messages can be uploaded, a single message is played per configured frequency, in the order they are uploaded. Specify 0 to turn these announcements off.
      • Queue Timeout: Set how many seconds can a caller be left in the queue (0 for no time limit). After the queue times out the call will continue in the call flow detailed in the ‘Be Connect Call Flow Priority’ article. This way calls that time out can be answered elsewhere.
      • Queue Identifier:  Configure the Text displayed in front of the Caller ID information when the call is delivered to an agent via this queue. This helps agents identify the a call is from this queue.
      • Include estimated hold time: Includes the estimated hold time in queue during ‘Queue Position’ announcements.
      • Report the hold time of the caller to the agent: Advises the agent of the caller hold-time when the agent receives the call and before connecting to the caller.
      • Answer Confirmation: When enabled any off-net call recipients will be prompted to accept the call, if they do not accept the call it will return to the call flow as if unanswered.
      Cloud PBX features, Knowledge Base

      Be Connect Queue Breakout

      Queue Breakout enables queueing callers to leave the queue and go to a different cloud PBX feature or number.

      By combining the feature of uploading a custom ‘Queue announcement message’—which outlines the options available to callers while they wait—Queue Breakout enhances your control over inbound calls and empowers your customers with greater flexibility in their choices.

      Setting up Queue Breakout

      To configure this feature
      Under Cloud PBX select the number you wish to set Queue Breakout on
      Select “Inbound Calls” -> “Queue Breakout” 
      Set a ‘breakout type’ for each or any digits as required.
      Some breakout types will use the ‘breakout value’ if specified.

      Breakout types

      • Unused: Default value – use this setting if you do not wish to configure a digit
      • Forward call: Forwards the call to the number specified in the corresponding breakout value. This could be to another user or to a Cloud PBX number with a different call flow, for example a different queue or Auto Attendant. If no breakout value is specified with this type, then no action will be taken and the caller will be returned to the queue at their queue position.
      • Setup Callback: An automated callback will be created. The user will be asked to confirm their callback number and their call will be ended. A virtual queue participant will be created in the callers queue position. When this is answered by a queue agent they will hear a message playing ‘press 1 to connect call’. On pressing 1 the original caller will be called back and connected to this answering agent. The breakout value is not used for this type.
      • Go to unavailable voicemail: This sends the caller directly to a voicemail. The caller will be played the ‘unavailable’ greeting of this voicemail. If no breakout value is configured then this will go to the queue number’s voicemail, if an on-account number is specified then the call will go to this voicemail, for any other input the caller will be returned to the queue at their queue position.
      Cloud PBX features, Knowledge Base

      Microsoft Teams – User Extension Numbers

      MS teams with Be Connect Teams Trunking configuration to allow use of user extension numbers

      Some teams users may wish to make use of the user extension number feature within the Microsoft Teams platform. As of Nov-2023 a change to the Microsoft Teams services means additional configuration on the Teams platform is required to allow inbound calls to route correctly. Below is a guide on how each number can be set up to allow the extension feature to work.

      1. Navigate to routing rules in the Teams Admin Center: https://admin.teams.microsoft.com/phone-numbers/routing-rules
      2. Select Add
      3. Under ‘Rule Name’ enter the number in national format e.g. ‘091234567 DID’
      4. Under ‘Evaluation Order’ enter the next available order number
      5. Under ‘Select a rule’ select ‘Single number’
      6. Under ‘Enter a number’ type the number in +E164, e.g. ‘+6491234567’
      7. Under ‘Route to’ select ‘Person in Organization’
      8. Under ‘Select a user’ enter the name of a user in your organization and select assign
      9. Select save
      10. The routing rule is now successfully configured, please allow up to 30 minutes for the rule to apply.
      Knowledge Base, Microsoft Teams

      SIP Trunking – Register Method

      SIP Trunks that use the registration method require authentication from the pilot number on the trunk.

      There are two configuration options when setting up a Be Connect Register Trunk

      1. Account Level Register Trunks

      Enables trunk registration at the account level. Once this configuration is applied, all voice numbers associated with the account will automatically link to the registered pilot number, including any numbers added in the future.

      2. Line Level Register Trunks

      Enables trunk registration at the line level. This configuration requires separate setup for each additional number you wish to connect to the trunk.

      Account Level Register Trunking

      Select the Pilot Number in the Cloud PBX

      Under “Preferences” -> “Register Trunking” tick ‘Enable register trunking on this account making this number the pilot’ and click “Save”

      All voice numbers on the account will automatically latch to the registered pilot

      Options

      • Preserve DDI information on calls to trunk: Preserves the dialled number in inbound CLI presentation.  Please check your PBX can support multiple DDIs on a single registration before enabling
      • Enable outbound trunking on this line: Allows outbound presentation of other phone numbers as Caller ID on your registered trunk without having to register each of those numbers. Recommended if you wish to present individual DDIs externally.

      Notes:

      Removing the pilot from the account will remove the associated register trunk. New logic will need to be configured for any remaining numbers.

      After you’ve enabled outbound trunking in the portal you can present another number on the account as your Caller ID by configuring your PBX to send the SIP headers described in the Registered Trunk section of ‘SIP Trunking – Outbound Caller ID‘. 

      Line Level Register Trunking

      There are two steps to setting up a register trunk at line level.

      Step One: Inbound Trunking

      Select the DDI you wish to attached to your trunk in the Cloud PBX

      Under “Inbound Calls” – > “Call forwarding or trunking” use the drop down box to select your pilot number and click ‘Save’

      Select ‘Preserve DDI information on Inbound trunked calls’ is you wish to preserve the dialled number in inbound CLI presentation.  Please check your PBX can support multiple DDIs on a single registration before enabling

      Step Two: Outbound Trunking

      Select Pilot Number in the Cloud PBX

      Under “Outbound Calls” – > “Outbound Trunking” tick ‘Enable outbound trunking’ and Click ‘Save’

      After you’ve enabled outbound trunking in the portal you can present another number on the account as your Caller ID by configuring your PBX to send the SIP headers described in the Registered Trunk section of ‘SIP Trunking – Outbound Caller ID‘. 

      Notes

      • Display name: Most devices such as soft phones and IP Phones refer to the name part as the Display name.
      • Asterisk based PBX systems the name part can be set in the SIP or IAX2 configuration with the callerid= field – or if you wish to present it in the dial plan then you use the CALLERID (name) variable. By changing this name part to the number you wish to present on the call you can achieve multiple caller ID presentations for each DDI over a single registration or login.
      • P-Asserted-Identity: see also a P-Asserted-Identity header (RFC 3325) to define the Caller ID as an alternate to manipulating the name field (subject to your system support for RFC 3325).
      Knowledge Base, SIP trunking & PBX setup

      Using CLI Passthough with Be Connect Cloud PBX

      If you want original caller ID to be presented on diverted/forwarding calls and are using the Be Connect Cloud PBX CLI feature you will need to turn on the CLI passthrough feature. 

      Quick Guide

      To enable CLI Passthrough go to the Cloud PBX and

      Under outbound calls > caller ID & privacy settings

      Check the Enable CLI passthrough box and save.

      When set, the caller ID override preferences set on this page will be ignored for diverted calls; therefore, original A party is presented to the forwarded party.

      Knowledge Base, SIP trunking & PBX setup

      SIP Trunking – Outbound Caller ID

      Here is how to manage Caller ID Settings for outbound calls on Be Connect SIP Trunks.

      To ensure correct outbound caller ID presentation, your PBX must be configured so that the following headers are set in the SIP INVITE message. Additional headers are required when doing ‘A party passthrough’. A party passthrough is where the original calling number is displayed to the recipient of a transferred or diverted call – instead of displaying the number forwarding the call.

      SIP Peering Trunk
      •    ‘From’ URI user: Must be set to the trunk pilot number or a trunk DDI number.  This header is the caller ID to be presented to the callee unless overridden by another header.
      •    P-Asserted-Identity or ‘From’ URI display name (optional): Can be set to the trunk DDI number originating the call. This header is the caller ID to be presented to the callee and overrides the caller ID specified in the ‘From’ URI user.

      SIP Peering Trunk – Additional Headers for A party passthrough on forwards or blind transfers:
      •    Diversion:  Must be set to the number on your trunk that is forwarding the call.
      •    P-Asserted-Identity or ‘From’ URI display name: Must be set to the original A party being passed through. This header is the caller ID to be presented to the callee and overrides the caller ID specified in the ‘From’ URI user.

      SIP Peering Trunk – A party passthrough example:
      Call scenario:
      A party 091234567 (Original Caller – Caller ID to display on forwarded call)
      B party 037654321 (Called trunk DDI number and number forwarding the call)
      C party 0212345678 (Number the call was forwarded to)

      Headers for the forwarded call sent to Be Connect:
      From: <sip:037654321@203.0.113.1>;tag=as1af6bbdc
      To: <sip:0212345678@198.51.100.2>
      Diversion: <sip:037654321@203.0.113.1>;privacy=off;reason=unconditional;counter=1;screen=no.
      P-Asserted-Identity: <sip:091234567@203.0.113.1;user=phone>

      Call recipient 0212345678 will see an incoming call from the original caller number 091234567

      Registered Trunk
      •    ‘From’ URI user: Must be set to the registered trunk pilot number. This header is the caller ID to be presented to the callee unless overridden by another header.
      •    Authorization user name: Must be set to the registered trunk pilot number.
      •    P-Asserted-Identity or ‘From’ URI display name: Can be set to the trunk DDI number originating the call.  This header is the caller ID to be presented to the callee and overrides the caller ID specified in the ‘From’ URI user. Requires ‘Enable Outbound Trunk’ to be enabled on the pilot number in the portal.

      Registered Trunk – Additional Headers for A party passthrough on forwards or blind transfers:
      •    Diversion: Must be set to the number on your trunk that is forwarding the call.
      •    P-Asserted-Identity or ‘From’ URI display name:  Must be set to the original A party being passed through.  This header is the caller ID to be presented to the callee and overrides the caller ID specified in the ‘From’ URI user. Requires ‘Enable Outbound Trunk’ to be enabled on the pilot number.

      Registered Trunk – Outbound call example:
      Call scenario:
      Registered pilot number: 039999999
      A party 037654321 (Caller – trunk DDI number originating the call)
      B party 0212345678 (Callee – number being dialled)

      Headers for the call sent to Be Connect:
      From: <sip:039999999@203.0.113.1>;tag=as1af6bbdc
      To: <sip:0212345678@198.51.100.2>
      P-Asserted-Identity: <sip:037654321@203.0.113.1;user=phone>
      Authorization: … username=”039999999″ … (attenuated in this example)

      Call recipient 0212345678 will see an incoming call from the trunk DDI number 037654321.

      Registered Trunk – A party passthrough example:
      Call scenario:
      Registered pilot number: 039999999
      A party 091234567 (Original Caller – Caller ID to display on forwarded call)
      B party 037654321 (Called trunk DDI number and number forwarding the call)
      C party 0212345678 (Number the call was forwarded to)

      Headers for the forwarded call sent to Be Connect:
      From: <sip:039999999@203.0.113.1>;tag=as1af6bbdc
      To: <sip:0212345678@198.51.100.2>
      Diversion: <sip:037654321@203.0.113.1>;privacy=off;reason=unconditional;counter=1;screen=no.
      P-Asserted-Identity: <sip:091234567@203.0.113.1;user=phone>
      Authorization: … username=”039999999″ … (attenuated in this example)

      Call recipient 0212345678 will see an incoming call from the original caller number 091234567.

      Knowledge Base, SIP trunking & PBX setup

      What is SIP Peering

      Some IP-PBX’s cannot be configured to register/login to Be Connect as a client, so for these types of devices SIP Peering is the only way you can interconnect with Be Connect.

      SIP Peering has many other benefits over a dynamic registration including:

      • Your device does not need to be logged in or registered, so calls will always be routed to your IP-PBX. This means that if your internet connection was reset or went down temporarily you would start receiving calls immediately once your internet connection comes back up (instead of having to wait for a re-registration or login)
      • You can route all your numbers easily to your IP-PBX with no further configuration required. If you add more numbers to your account then they will automatically be routed down your trunk.
      • You save bandwidth since there is no need for SIP registrations or ‘polling’ traffic usually sent to devices that are behind NAT.
      • Peering SIP Trunks have the concept of a ‘pilot’ number. You can present any caller ID number down your trunk and if it is not recognised as being on your account then the caller ID will be set to the trunk number. This makes configuration simpler and avoids outbound calls ever being rejected.
      Knowledge Base, SIP trunking & PBX setup

      NZ-based support, 24/7 · one provider, one bill